
Making Merged Documents Portable
If you plan to Merge to New Document (Word 2002/XP & 2003) or Edit Individual Documents (Word 2007 and later), this option may be useful to you. Such merges are referred to as Merging to Document.
To minimize disk storage, OnMerge normally stores only the name of the images in documents that you create when merging to document. This is fine as long as the document will only be subsequently opened on the same computer which did the merge, and as long as the image files stay the same.
If you send the merged document to another computer, the image files may not be available on that computer or may be in a different location. That situation will likely lead to problems for the users of those other computers.
To avoid those problems, check the Copy these images... box in the Merge Options tab of the OnMerge Dialog. That will cause OnMerge to copy the corresponding merged image for each record into the merged-to document.
Note that this option is set per-image, meaning that each OnMerge Image in the template document has an independent Copy these images... setting. One OnMerge Image's setting will only affect the images that result from merging that particular template image, meaning that you must set the option for all template images if you require a truly portable image. This independence allows you to copy only certain images into the document to minimize disk space requirements.
Remember that image files take up a lot of storage, so all of those copies can slow Word and cause the merged document to become huge. Also, Word limits documents to 500MB including any images that are copied into the document. This means that you must be careful with this option and only use with caution when really needed. As explained above, you may elect to copy only some images into the document to minimize these issues. If you only plan to merge to a printer or email, we recommend that you leave this option unchecked to maximize processing speed.
Auto-Rotate Saved Images
Images can often appear rotated or upside down when you merge them, especially JPEG images from digital cameras. OnMerge Images can optionally rotate images when it merges them. You can select options to
- Auto-rotate each image to match the camera's orientation (portrait or landscape -- vertical or horizontal) when the shot was taken,
- Always rotate by a fixed angle you specify (fixed, non-auto rotate)
- Match the camera's orientation and further rotate by a fixed angle
- Conditionally rotate only landscape images to portrait, or vice versa
Note that Auto-Rotate is only available when Copy images..., above, is selected. Rotated images are always stored in the Word document.
When merging images that are a mix of landscape and portrait orientation images, it's often best to use a square Hidden Image Box to ensure that it can accomodate both orientations.
Alternately, you force images to be all-landscape or all-portrait by using the To Portrait and To Landscape options. For example, the To Portrait option will rotate a landscape image 90 degrees, but will leave portrait images alone. There are two versions of each option -- left and right -- since rotating an image in the wrong direction will turn it upside down.
(OnMerge Images Suite only) The To Portrait option is can be useful when merging full PDF pages using OnMerge PDFpasteup in the case where the entire source PDF might be in the landscape orientation. Using this option lets you auto-rotate such pages if necessary to fill a portrait page. Note that the decision to rotate a PDF page is based on the page's orientation before any cropping and before any Trimming.
Remove Halftone Dots (Descreen)
Removes (descreens) halftone dots from photos and scans.
- Descreening is done to the copy of the image in the Word document. The original is unaffected.
- OnMerge automatically detects the size of the clusters of halftone dots (aka "halftone period" or frequency). It will skip the descreening step if it doesn't detect halftoning, though the auto-detection can be fooled by certain images.
- Descreened images may appear slightly fuzzier than the halftoned originals. That's because halftones are designed to trick the human eye into seeing detail "between the dots."
- Descreening will shrink the image by half the halftone period. For example, a halftone period of 16 will result in shrinking the image to 1/8th of its original size. This will result in a smaller file size, though OnMerge's other features will automatically rescale the image to appear at its original size.
- When photographing printed images, make sure the camera is completely parallel (not at an angle) to the page. Holding the camera at an angle makes the farther-away part of the image look smaller, i.e. appear to have a finer dot pattern while the closer part appears to have a coarser pattern. That confuses OnMerge since it assumes the entire image has the same halftone period. (See the TIP below.)
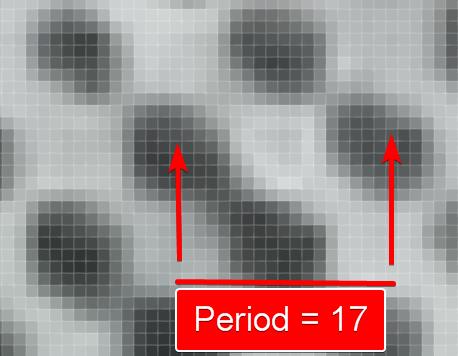 We recommend you use this option whenever you know that images are halftoned, even if they look OK on your screen. Scans or photos of photographs printed on paper (except photo paper) will have a halftone pattern. As shown on the right, you can see that pattern as clumps of dots when you zoom in closely.
Halftone dots may or may not show up on-screen as an unattractive interference (Moire) pattern, but they will almost certainly show an interference pattern when you print the image. Also, halftoned images may seem to look fine on-screen, but will likely create an interference pattern when viewed at certain magnifications or on different monitors.
Note that Remove Halftone Dots is only available when Copy images..., above, is selected. Descreened images are always stored in the Word document.
Do not use this option unless needed. OnMerge will descreen images only if it detects a halftone pattern, but the halftone-detection process slows down OnMerge. Rarely, OnMerge also might erroneously detect and "remove" halftones that aren't really there, resulting in degraded images.
TIP when photographing printed images for merging: Since you'll be holding your camera horizontal (flat) over the page, the camera's sensor has no idea where "up" is -- it's designed to be held vertically. To fix that, be consistent how you orient (rotate) the camera relative to the page as you make a batch of photos. Later, use OnMerge's Rotate feature (above) to fix rotated images if they don't come out straight. Do not use auto-rotate since the camera's idea of "up" is random and may change photo-to-photo. Instead, choose one of the plain, fixed rotations: Left, Right or Flip. This works because you were consistent about camera orientation when you took the photos.