By default, OnMerge Images creates images inside a box that is 1" (2.5 cm) square.
Resizing the OnMerge Image
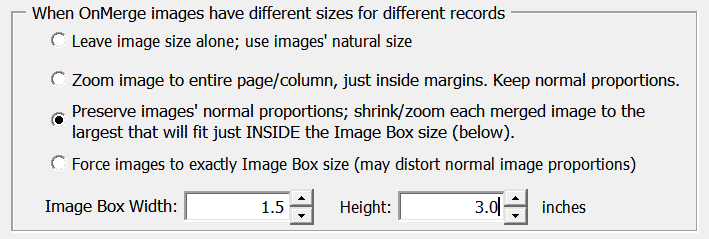
Different images that you merge in the same spot may have different sizes and orientations. When you actually do the merge, OnMerge will size the image to the largest possible size that your master template supports.
There are two ways to tell OnMerge what that maximum size is:
- Adjust the Image Box Width and Height controls on the Merge Options tab of the OnMerge dialog; or
- Drag the image's corner so that it fills the maximum width and height (image box) that the image could possibly occupy in your layout. As you drag the corner, note that the image may appear distorted or stretched but OnMerge will correctly resize the image as soon as you release the corner. The maximum image box briefly flashes pink to give you a visual confirmation of the maximum size possible.
When merging images that are a mix of landscape and portrait orientation images, it's usually best to use a square Hidden Image Box to ensure that it can accomodate both orientations.
Viewing the Hidden Image Box
OnMerge will remember the maximum image box you just sized and use that size in the merge even though it does not appear on-screen in the master template. To view the maximum box size, double click on the image to bring up the OnMerge Images dialog; the maximum box size will be temporarily highlighted in pink. Note that, unless all merged images have exactly the same proportions, you may end up with white or blank space on sides or tops of the merged images since each merged image may have different proportions than the maximum image box.
OnMerge Images That Are Always the Same Size
You may occasionally need to force all renditions of an OnMerge Image to exactly the same size, even if that means distorting some of the images' proportions. To do that, bring up the OnMerge dialog for that image and select the Merge Options tab. Select the Force all images to exactly the same size radio button and press OK as shown:

To return images to their normal proportions, select the Preserve images' normal proportions button.
Disabling Image Sizing
Select the Leave image size alone... button. Images will keep the dimesions that are saved in each image file. Note that files' built-in image sizes can sometimes be much larger than you expect, including those made with many popular digital cameras.
Full-Page or Full-Column Sizing
Select the Zoom image to entire page/column... button. Images will be scaled to just fit within the margins of the page (or text column) where the cursor is currently located.
(OnMerge Image Suite only) This option can be useful when merging full PDF pages. This will size the pages to the appropriate size for your Word document, but you may need to use PDF page cropping or the Trim Margin option to remove blank margins and/or page header/footers from the PDF page to make it fit in your new layout.