
The File Name formulas that you create may generate some file names that refer to image files that don't actually exist. That may be on purpose, or it may be due to an error or omission. Depending on your purposes, you can set OnMerge Images' behavior when it tries to merge a missing file.
Setting the Missing-image Behavior
Click the Merge Options tab in an image's OnMerge Images dialog to access the missing-image action frame. Select one of the buttons to indicate what should happen in that picture when an image file is missing.
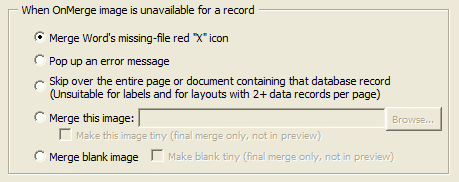
Merge Word's missing-file red "X" icon causes an icon like
this  to
be shown instead of the missing image. The "X" icon will be resized
to the picture's box as described in the Sizing
Your Image topic.
to
be shown instead of the missing image. The "X" icon will be resized
to the picture's box as described in the Sizing
Your Image topic.
Popup up an error message causes a dialog box to pop up with details about the missing file name. If you choose to ignore the error, the "X" icon will be displayed in the image's place.
Skip over that database record entirely cancels the merge for that record (row) of the data source and causes the merge process to move on to the next record. Use this option if it is only useful to merge a given record if the OnMerge Image is available for it.
Merge this image lets you specify one fixed image to use instead of missing images. When this option is selected, you can enter a file name, or you can press the Browse button to select the file from a list. The file must be on your computer or local network, and not on the internet. The Make this image tiny option is available when Merge this image is selected.
When the Make this image tiny checkboxbox is NOT checked, the missing-image image will be resized to the picture's box as described in the Sizing Your Image topic. If the missing-image image itself is missing, OnMerge Images will merge Word's red "X" missing-file icon instead.
When the Make this image tiny checkboxbox IS checked, the missing-image image or "X" icon will be made very small. The exact size of the image shown depends on several factors, but smaller-sized original image files usually shrink down to 1/72" (0.35 mm) square -- roughly the size of the period at the end of this line. Larger image files typically do not shrink to such a small size: expect their "tiny" versions to have a slightly more noticeable size.
You can create whatever image you prefer for the missing-image image. When you do that, bear in mind that the missing-image image will be resized to fit the picture's box unless you check Make this image tiny.
The result of selecting Make this image tiny will show up in final merges only. Word's on-screen preview will not make preview images tiny because they'd be too small to select and edit.
Merge blank image will make OnMerge use a blank for missing images. The Make blank tiny option is available when Merge blank image is selected; it works just like the Make this image tiny option of Merge this image, above. Again, the result of selecting Make blank tiny will show up in final merges only. Word's on-screen preview will not make preview images tiny because they'd be too small to select and edit.
Merge blank image with the Make blank tiny option is the closest OnMerge can come to making a missing image completely disappear without taking up any space: it is invisible except for adding a tiny, hard-to-notice blank space to your layout.
For example, if you had several possible image names but only one of them valid for a given record, you could easily create many such OnMerge images side-by-side; the missing images would occupy a negligible amount of space, and only the valid image would appear to display in the space provided.