To insert a barcode, the OnMerge Barcodes software must already be installed.
- Place Word’s cursor where the barcode should appear. If you need to place the barcode somewhere away from the cursor, see here.
- Pop up OnMerge Barcodes by clicking [Word 2007 and later]: Mailings,
OnMerge Barcodes, or [Word 2002 – 3]: the
 button in
the Mail Merge
toolbar. See here for details.
 - The OnMerge Barcodes dialog will pop up with the Barcode Setting tab showing. Fill in the appropriate settings. At a minimum, this will probably include the Barcode Type, Barcode Width and Barcode Height. See here for details.
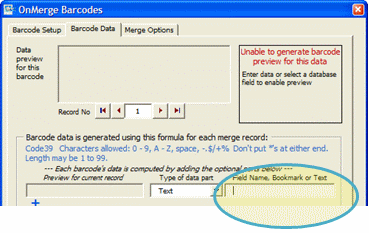
- Click on the Barcode Data tab. Since you’re going to be entering data
manually, you’ll only be using the first, rightmost field immediately
under Field Name,
Bookmark or Text, shown below:

- Click in that field to place the cursor, then enter the barcode data. The preview area in the top, right corner of the dialog box will show a live preview as you type.
- If the preview area displays an error message, review the data-format rules shown in blue above the data entry area. This area will explain any restrictions on the character set, amount, and format of the data that apply to the particular Barcode Type you’re creating.
- Press OK. You’re done.