How
to Format and Position OnMerge Images and Barcodes
OnMerge Images and Barcodes with Database variables or Bookmark lookups must go inside 1x1 tables if/when you need them to be page-positionable, but Word leaves white gaps at the edges of tables.
This cheat sheet reveals how to perfectly fit OnMerge in tables, with a more detailed video below it. We show the process with OnMerge, and the same process also works for text, regular images, etc.
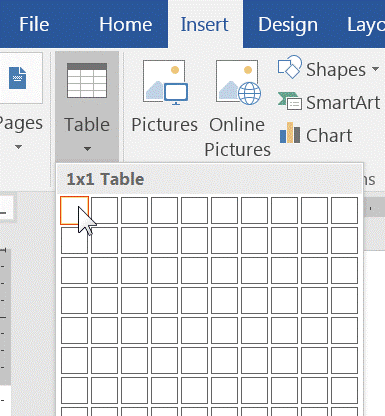
Click Insert + Table, click top, left (1x1) square.
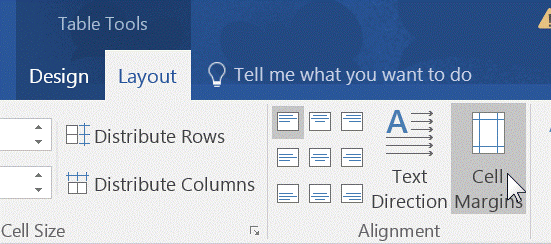
Click Table Tools, Layout,Cell Margins to get the Table Options popup.
Set all Default cell margins to zero.
Optional: Change the Automatically resize… option to suit your needs. Uncheck it if you always want the table the same size, no matter what size the image is.
Tip: The Automatically resize… option will make the table larger if the inserted picture is larger, but will not make it smaller if the image is smaller.
Press OK.
Set the image's centering within the table with Table Tools, Layout, Alignment.
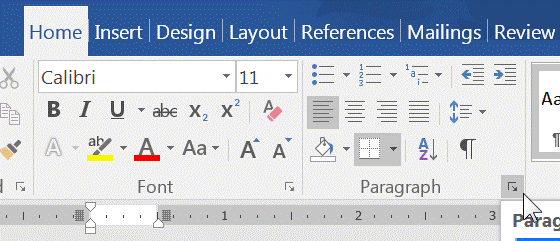
Make sure the cursor's inside the table (click inside the table if necessary).
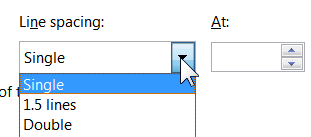
Select the Home menu, then the small diagonal arrow at bottom of Paragraph to get the popup menu.
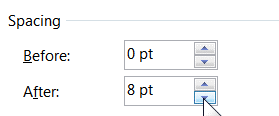
Change Spacing Before and Spacing After to zero.
Change Line Spacing to Single.
Click OK.
Insert an OnMerge image inside the table as usual.
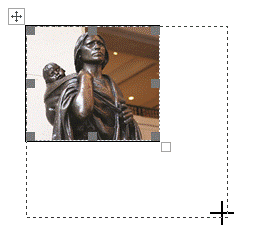
To resize the OnMerge image:
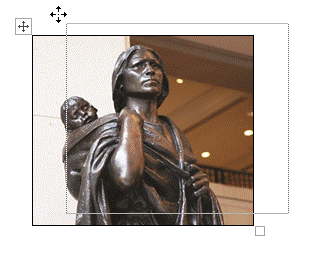
slowly click on the center of the image (not the table borders) until you get small selection rectangles at the corners and edges of the image
drag the bottom, right rectangle to resize
click outside the image to finalize the size.
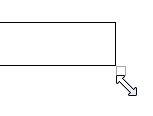
Drag the small square at the bottom, right of the table border to resize it to better fit the image.
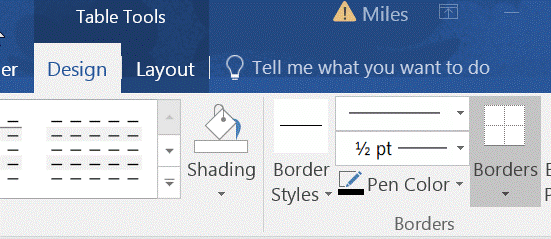
You can optionally remove or change the table borders with the controls on the Table Tools + Design ribbon
To position the table with image on the page, hover over the edge of the table until you see a 4-arrow box at the top, left. Click and drag the 4-arrow box.
Video Transcript
You may be accustomed to framing pictures or placing pictures at specific places
on the page by using picture formatting or text boxes, but you can't do that
with OnMerge images. Instead, you can very easily do the same thing by placing
an OnMerge image into a 1 x 1 table, then formatting or positioning the table.
Of course, that's only necessary for OnMerge images; it's business as usual for
regular images.
I'm going to very quickly demonstrate doing this using the ABC Dealership
Sales Letter Sample which ships with OnMerge Images. I’ll position the
OnMerge image in the top right corner of the letter, place a border around
it, and even show you how you can overlay some text on top of it.
To start, I'm going to insert a blank 1x1 table near where I want it. That’s
Table, Insert, Table, 1 row, 1 column, and Autofit to Contents. When you hover
near the edges of the table, you'll see the four-headed arrow on the top left.
You can grab that four-headed arrow to move the table around like this, or
you can click it to select it.
Once the table is selected, you can format it with Table, Table Properties.
This works very much like the regular text wrapping controls where you can
adjust the alignment, positioning and the text wrapping around the table. Use
the Borders and Shading button to get rid of the default border, or change
its style and color if you like. Here, I'm setting up a border that will be
easy to see on this video.
You can insert a new OnMerge image into the table by placing the cursor inside
of it and inserting an OnMerge image as usual, or you can drag an existing
OnMerge image into it like this.
You'll notice that there is a small amount of blank padding on either side
of the picture frame. To get rid of it, just go back to the Table Properties,
click on the Options button, and set the Left and Right Margins to zero.
How to Place Text Over OnMerge Images and Barcodes
That's all there is to formatting and positioning OnMerge images, but some
people have asked how to place text over OnMerge images in tables. Make sure
nothing is selected; click on Insert, Text Box; press the Esc key to skip the
drawing canvas; click and drag the mouse to create a text box.
To get rid of the text box’ opaque background and black border, hover
the mouse over the border until you see that four headed-arrow again, then
click to select the text box. You can now select Format, Text Box; go to the
Colors and Lines tab, and change both the Fill and the Line Colors to No Fill
and No Line. I’ll position the text box over the OnMerge image, enter
some text, and format it.
I'm John D. with OnMerge, and that's how easy it is to position and format
OnMerge images.