Need to mail merge photos and images to create a directory, catalog, or a bunch of letters with many different photos, signatures, logos, and so forth?
This article shows 2 alternative methods side-by-side.
Step-by-Step How-To Using INCLUDEPICTURE Field Code
Use the classic IncludePicture merge field code built into Word |
Quick Easy Shortcut When Time Is Money
Use a power tool to make the job fast, easy |
Before You Start |
Before You Start |
| |
The IncludePicture field code is FREE, but finicky. Very.
And, yes, you'll need to do some manual field coding. But you already knew that because you searched for this article.
So... set aside some quiet time.
Follow the procedure below exactly. Looks simple, but you have to get everything exactly perfect. |
The power tool is OnMerge Images, a Word software add-in. It replaces IncludePicture and does much more, makes merging images fun.
OnMerge Images makes the time-consuming field coding, gotchas and operational hassles of IncludePicture just go away.
To start, make sure the OnMerge Images is installed in Word.
Get a free trial version of OnMerge here. |
IncludePicture Field Step By Step, Latest Simplified Method
|
OnMerge Images Step By Step
|
| 1 |
Name the picture or image files the same
as (i.e. keyed to) the contents of a field in the database. For example, if you have a database
which includes a “FirstName” field, you might name personnel photos “John.jpg,” “Mary.jpg,” and
so forth. The key to variable
images is to have a collection of photo or image files in a folder on your
computer or network. |
Same as for IncludePicture, name the picture or image files the same
as (i.e. keyed to) the contents of a field in the database. For example, if you have a database
which includes a “FirstName” field, you might name personnel photos “John.jpg,” “Mary.jpg,” and
so forth. The key to variable
images is to have a collection of photo or image files in a folder on your
computer or network.
Extra: Once you're comfortable with this, you could easily set up OnMerge Images to merge with multiple database fields. For example, you could use the FirstName and LastName fields to select photos like "Debra Johnson.jpg" |
| 2 |
Save As the document in the old-school Word 97 - 2003 .doc
format—NOT the newer Word 2007+ .docx format.
The IncludePicture field does not work
in .docx documents because there's a bug in Word that will randomly turn IncludePicture field codes into fixed images when you least expect it. |
Use .doc or .docx document formats. Both are fine. |
| 3 |
Select the data source (database) into the master document
you’ll
be working with using Mailings + Select Recipients + Use an Existing List. |
Select the data source (database) into the master document
you’ll
be working with using Mailings + Select Recipients + Use an Existing List. For example, you can use Excel spreadsheet, a CSV file, almost any database, etc. |
| 4 |
Place the cursor where you
want to position your image.
Insert an image from the image collection
(any of them will do for now) onto the page in the usual manner
using Insert
+ Pictures.
Wait! Do not press the Insert button at the bottom of the Insert Picture dialog box as usual
after selecting the file. Instead, press the little triangle on the
right edge
of
that button to get a three-line menu, and click Link to File. NOT Insert or Insert and Link.
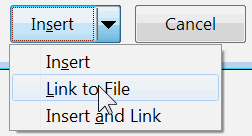
Do
not attempt to format or resize the picture. |
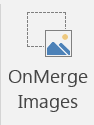
Place the cursor where you want to position the image.
Click the OnMerge Images Icon in the Mailings ribbon. The OnMerge Images dialog pops up.
  |
| 5 |
To make the image variable: Press the Alt
+ F9 key
combination. The picture you just inserted will now appear as something
like this (all on one line—ignore the break between lines shown below):
{ INCLUDEPICTURE "c:\\staff\\pictures\\John.jpg"
\*MERGEFORMAT \d }
Note that copying and pasting the above text from this article into
Word will not work. You must carry out this procedure as described. |
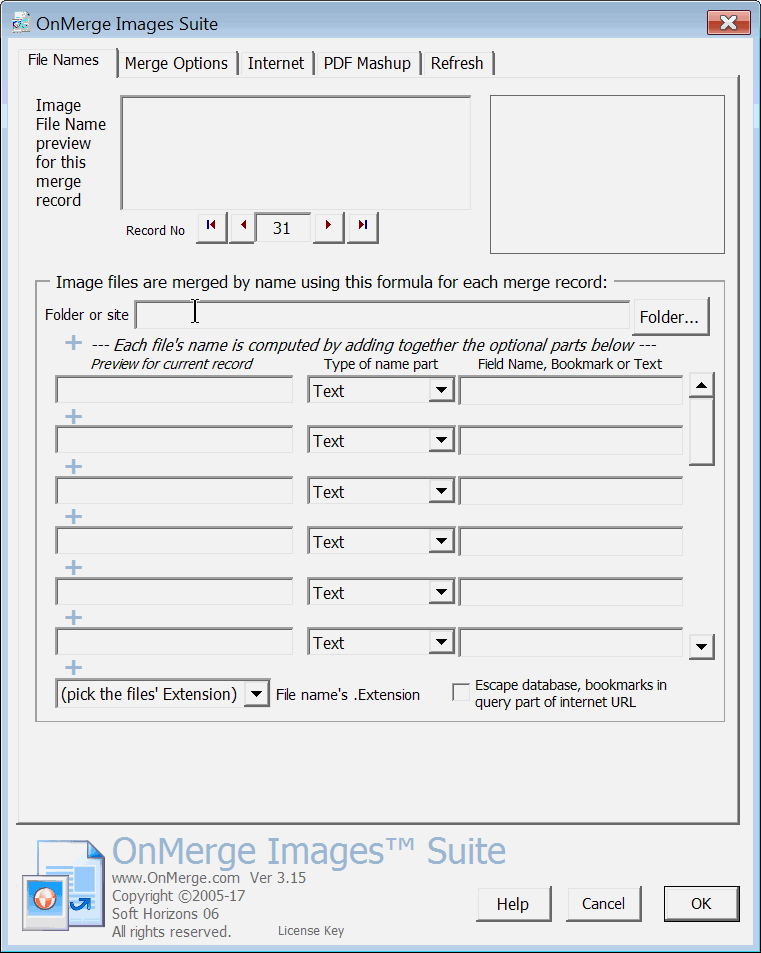
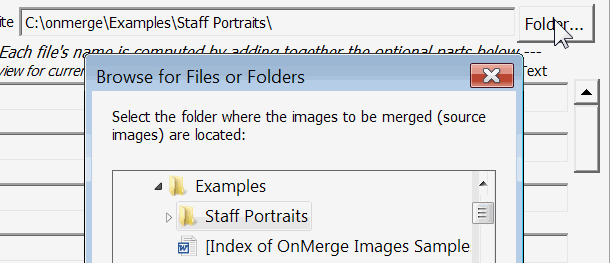
Click on the Folder button to get a popup, choose the folder with your images, press OK.
 |
| 6 |
Select and delete
the filename portion, but leave the folder name(s) with the
backslashes, and
leave the
file’s “extension” (.jpg in this case, might
be .gif, .bmp, .tif or other).
The doubled-up backslashes are no typo: Word requires them that way.
In this example we’ll
only remove John and
the line will now look something like (again, ignore the line break):
{ INCLUDEPICTURE "c:\\staff\\pictures\\.jpg"
\*MERGEFORMAT \d
Leave the cursor where John used to be. |
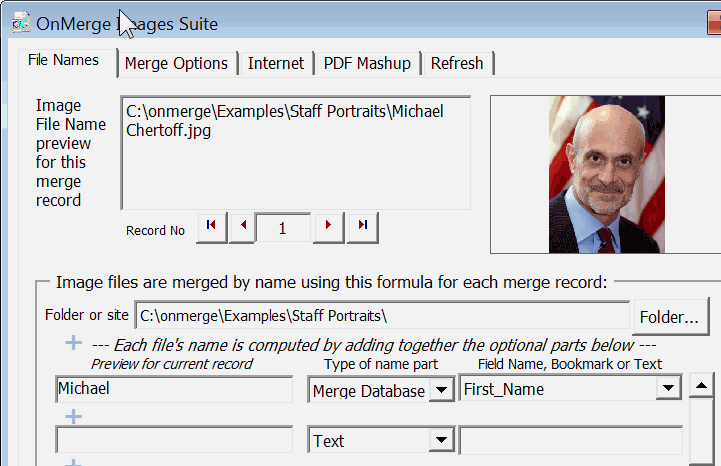
In the first line under the folder name, under Type of name part, click small right triangle to see a list of field types. Select Merge Database.
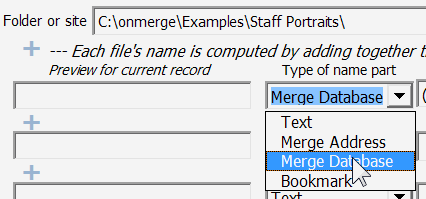
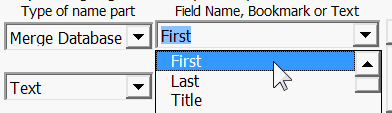
Immediately to the right, drop down the Field Name and choose the data field's name.
 |
| 7 |
Press Mailings + Insert
Merge Field and select the database field you need.
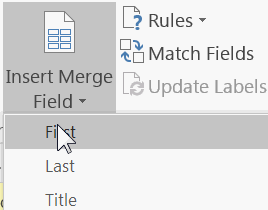
In this
example, you'd
get (again, ignore the line breaks below):
{ INCLUDEPICTURE "c:\\staff\\pictures\\
{ MERGEFIELD “FirstName” }.jpg"
\*MERGEFORMAT \d } |
You'll immediately see a preview of the image in the top, right corner. A preview of the picture file's full name is to the left for reference.
 |
| 8 |
Press Alt
+ F9 again
to go back to Picture View to view your handiwork. |
That's it! Press OK. The picture will appear in your document at the cursor location. |
| 10 |
Run the Mailings, Finish & Merge, Edit Individual
Documents. That's Word's way of saying "create a new document with the merge results."
Do not merge to a printer,
fax or e-mail.
The images in the new document won't appear to have merged correctly. The next step will fix that. |

Images will update when you use Word's Preview Results controls to scroll through database records.
Finish & Merge as usual.
Merging to printer and e-mail work fine as well. |
| 11 |
Very important after-merge steps:
- Select the new document
- Press Ctrl + A
- Press F9
You can now print the resulting document or save as a PDF.
Mail merge to e-mail is not possible. |
No after-merge steps are needed.
|
Heads Up:
Surprising Problems You'll Probably Have + Workarounds
|
OnMerge Obsoletes Those Problems
|
| |
Wrong Merged Image Size
Merged images will probably be the wrong size.
Don't attempt to change the picture in the original Word document. If you
do so, the change will appear to work but Word will change the image back to the
incorrect size as soon as you do a merge. That's one of
Word’s quirks: whenever it merges in a new image, Word resets the image to its “natural” state. That’s just the way Word works,
so you must work around it.
There are two ways to
work around the image-size quirk:
- Before merging, change all original images’ size to the desired size using Photo Editor or similar software
- After the merge is done, manually resize troublesome images in the resulting document.
Those are the only options, aside from unfriending Bill Gates. |
Auto-resize Pictures
OnMerge automaticlly resizes pictures to fit in a given space.
 To resize, click on an OnMerge image in your document to reveal small selection rectangles on each corner. To resize, click on an OnMerge image in your document to reveal small selection rectangles on each corner.
Drag any corner to set the width and height of the overall image.
OnMerge can automatically shrink or stretch the photo to fit just inside a pre-determined area while keeping the pictures' correct proportions. That's extremely handy when you have:
- different-sized pictures
- both landscape and portrait images (horizontal & vertical) in the same collection
|
| |
Image Rotation and Mis-Orientation
Merged photos may be sideways, or even upside down.
It's not a bug in Word, just the way Word has always worked.
Don't attempt to change the picture in the original Word document before the merge. If you
do that, the fix will appear to work but Word will change the image back to the
incorrect orientation as soon as you do a merge. This is one of
Word’s quirks: whenever it merges in a new image, Word resets the image to its “natural” state.
There are two ways to
work around the image-size quirk:
- Before merging, change all original images’ orientations to the desired size using Photo Editor or similar software
- After the merge is done, manually rotate troublesome images in the resulting document.
|
Automatic Image RotationOnMerge fixes this Word "feature"... unless you actually want your images turned sideways or upside down.
To automatically rotate images: double-click on an OnMerge Image to pop up the dialog box. Select the Merge Options tab.
Select the Copy images... checkbox.

You can also select one of the Auto-Rotate options from the list to force images to be turned in a particular way. Press OK. |
| |
Missing Photos and Images
Often your finished merge will have some images missing,
with a red-X box like this in their places.
That is what
Word does if the database look-up comes up with a file name which doesn’t
exist. There’s no way to get rid of the red X except to give Word what
it wants: an image file. If you don't want an occasional red X,
you can either:
- fix the database if the data is genuinely incorrect
- create suitably-named all-white "dummy" image files for each missing name
using Photo Editor or other program, or
- delete the red X's after the final merge
Remember: the data you’re
testing with may not have missing image files, but be aware that missing
images may occur when you roll out with a larger database.
It’s important to take steps to check data and merge results to make sure that they're
clean, or that there are dummy files for all possible missing names. |
Alternative Image for Missing Images
OnMerge Images can do whatever you need whenever image files are unavailable for certain merge data records. Automatically.
Double-click on an OnMerge Image to pop up the dialog box. Select the Merge Options tab. Select an option as shown here:
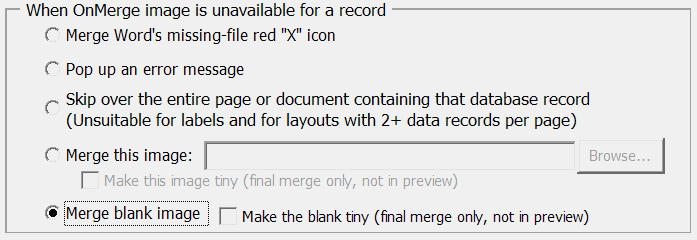
Notice you can even select a default picture or graphic that'll be swapped in if the image file requested by a data record is missing. |
| |
Images from PDFs
IncludePicture cannot directly insert pictures and graphics that are in PDFs.
You can open the PDF in Word, then cut & paste each picture into a photo editor such as the Paint program that comes with Windows; save each picture to its own file.
You can also make screen grabs and save them to individual files if you aren't concerned about image quality. |
Mail Merge Directly from PDFs
Copy or mail merge photos or entire pages from PDF files using the PDFpasteup feature of the OnMerge Images Suite.
We don't have the space for details here, but this screenshot gives you an overview.

See here for details about merging from PDFs. |
Wrap Up
|
Get It Over & Done with OnMerge Images
|
| |
The above is the simplest, most reliable method for setting up manual INCLUDEPICTURE coding that we know of. That said, it's not just you: the INCLUDEPICTURE field code
is limited and tricky to use, but can be so very useful.
In summary, here are the
basic steps for successful variable image mail-merging:
- Use only an old-school .doc Word document;
- Rename image files to match the database (or change the database to
match images);
- Setup coding
of merge fields using a database;
- Resize each image
file to the correct size and rotation;
- Check and scrub
the database of names that don’t have corresponding
image files (or create dummy blank images);
- Run the Merge
to New Document—no merging directly to printer or e-mail;
- In the new document, press Ctrl + A followed by F9
|
OnMerge Images makes all the time-consuming field coding, gotchas and operational hassles of IncludePicture just go away.
Plus, there are dozens more ways OnMerge Images saves time, frustration and does things that otherwise would be impossible. To list only a few:
- define foolproof image-merging templates for staff
- merge pictures from websites
- grab & merge images from variable PDFs
- automatically resize each merged
image to fit a specific box size without “squishing” the
original
- automatically straighten rotated images
- compose an image file name from multiple database fields (such as FirstName + LastName)
- barcodes
Download your free OnMerge Images tryout version here.
Start saving time. |